Expert Tips for Getting Your Graphic Ready to Print
Quality signage boosts your brand awareness, connects with your audience, and communicates your marketing message. However, there are several factors to consider when preparing a graphic for print.
From choosing the best resolution for your graphic design to optimizing your bleed, our guide will help you discover the best tips before printing graphics.
Understanding Color Profiles
Color printing as we know it first came into existence in 1910, when new technology allowed for two- and three-color printing applications. Printers and design software have advanced significantly since then, giving you more control over the vibrancy of your color. Here's what you need to know about color profiles for optimal color quality in printing.
Navigating CMYK vs. RGB for Print
There are two central color systems — RGB and CMYK. The acronym RGB stands for red, green, and blue and is the color profile your computer uses. The colors that appear on your printed design will follow the CMYK model. CMYK refers to cyan, magenta, yellow, and key — another term for black.
Ensuring Color Consistency Across Devices
While cool colors appear similar across the RGB and CMYK color profiles, there is a more significant difference in warm colors. To ensure there are no discrepancies in the printed version of your artwork, you should create your design using your software's CMYK color space. Remember that computer screens vary in brightness, contrast, and warmth, which will ultimately impact how the color looks. If you're designing your artwork on one device and accessing it for printing on another, the colors may appear slightly altered.
Converting RGB graphics to CMYK is simple but will differ slightly depending on your software. If you're using Photoshop, follow these easy steps:
- Open the RGB image in Photoshop.
- Click the image function and select "Mode."
- Finally, choose CMYK, and you're ready to edit your design.
Mastering Bleed in Print Design
When your design goes to print, there's always a possibility of costly misprints. Adding a bleed to your design effectively reduces the chances of this occurring. Learn more about this printing element and how to leverage it in your designs.
What is “Bleed” in Professional Printing?
The term "bleed" refers to ink that goes beyond the trimmed edges of the canvas. Choosing the full-bleed option for your projects ensures a polished finish, as there are no distracting borders surrounding your image.
The dimensions of your project will determine your bleed size, but a good rule of thumb is 1/8-inch or more.
Setting up Bleed in Your Graphic Designs
Your software solution will determine how you add bleed to your designs. Here's a brief overview of how to set bleed on Photoshop, Illustrator, and InDesign:
- Photoshop: Specify the bleed with the Canvas Size command.
- Illustrator: Set your bleed by accessing the Document Setup dialog box.
- InDesign: Use the New Document function to determine your bleed.
Once you've completed this step, it's best to verify the accuracy of your bleed before printing. One easy way to do this is to select the Print dialog box or Print Preview option to determine the quality of your bleed. Alternatively, you can open the design in a PDF viewer and zoom in on various aspects to check design accuracy.
Optimizing Graphic Resolution for Print Clarity
Eye-catching designs create a memorable impact — but only when saved with the correct resolution. Discover how to optimize your resolution for maximum image quality.
Deciphering Resolution for Print
Dots per inch (DPI) refers to the number of ink dots per inch of content and is a vital measurement for resolution. While lower resolutions help online content load faster, printed designs require a higher DPI for better clarity.
The size of your project will impact the resolution you choose, but it's best to select a minimum of 300 DPI for printed designs.
Adjusting Resolution in Design Files
The most effective way to ensure the correct graphic resolution is to choose the right file format from the start. For printed designs, it is best to choose a vector format, such as EPS, SVG, or PDF. Once you've selected the graphic format, adjust your software and printer settings to ensure they support your design. This involves setting the color mode to CMYK and selecting at least 300 DPI. A print proof will give you a more realistic idea of the quality, enabling you to adjust your settings accordingly.
The Critical Step of Printing Proofs
You've designed your artwork in the CMYK color space, mastered the bleeding, and chosen the perfect resolution — but what will the final version of your artwork look like? A print proof will give you a realistic idea.
The Essence of Print Proofs in Design
Printing projects and test prints go hand in hand. A test print, or print proof, is the printed prototype of your final design. Print proofs allow you to check the quality of your colors, spot errors, and fix any discrepancies before the job goes to print. While you may have followed all the tips for getting your graphic ready to print, this step ensures you're pleased with the results.
There are several different types of print proofs, each with its own unique advantages. Here are some of the most common types:
- Hi-resolution proof: Samples printed with Pantone calibrated printers to ensure color and design accuracy.
- Soft proof: A simulated version of your design viewed on a computer screen.
- Press proof: A sample printed on the same material that the final design appears on.
- Plotter proof: Hard copies of the design printed on high-resolution ink-jet paper.
- Hard-proof: Designs printed on more cost-effective materials than the final job.
Collaborating With Print Experts for Proofing
A professional printing company offers a variety of proofing services, allowing you to have full confidence in your printed design. Duncan-Parnell makes this a priority by providing clients with access to soft or hard samples of their graphics to review. In evaluating your print-proof, check the following:
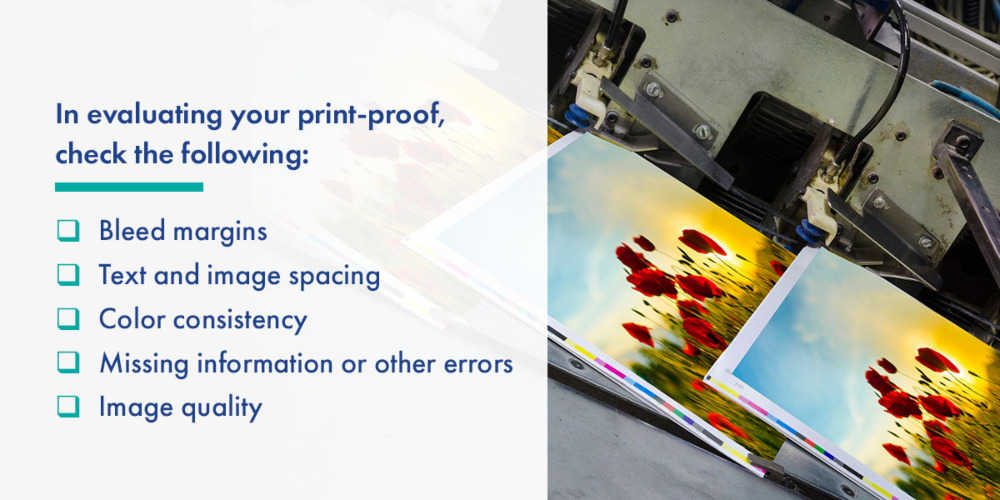
- Bleed margins
- Text and image spacing
- Color consistency
- Missing information or other errors
- Image quality
Choosing the Right Printing Tools and Programs
Printing tools and programs are constantly evolving, making it easier than ever to create impressive graphic designs. Here's how the right software and printing services impact the final product.
Selecting Software for Design to Print Workflow
While numerous graphic design software solutions are available, most businesses rely on Photoshop, InDesign, and Illustrator for print-ready files. These options are programmed to create files in the CMYK color space and have numerous other functions for better print quality.
One important consideration when choosing your file type is to ensure compatibility with the printing software. Establishing a positive connection at the start eliminates misprints and the need for troubleshooting.
Preparing and Submitting Design Files for Printing
Communication is essential in all business operations, and the same is true when partnering with a professional printing company. When submitting a job, add a pre-print checklist for optimal design file preparation. Your list can include font size specifications, image resolution, bleed margins, and more.
While most printing companies and their services work with all file types, some may be inaccessible depending on their software. Ensure your printing project goes smoothly by converting your artwork to a PDF. This format shows how the design you see on the screen will appear in print.
Ensure Quality Printed Designs With Duncan-Parnell
The first impression of your business relies on the quality of your signage. With these expert tips from Duncan-Parnell, you can confidently prepare your files for the highest quality results.
Now that you know how to prepare a graphic for print, it's time to put your creativity into action! Need expert guidance from design through to the finished print? Our Signs and Graphics services are here to support you with project management and high-quality print solutions. Reach out today to make your next print project a resounding success, from the initial design to the final product.